SuperIon is a triple-barreled marker, composed of Ion firing assemblies, that I use at Big Game format events. This page shows how I made it, and all the fun building trials I encountered. Another page is available about the actual performance and future refinements.
Here's a brief synopsis of this marker's features:
· Independent circuit boards for each marker.
· Independent regulators for each marker; velocity is controlled by each regulator for each individual marker.
· Each trigger pull will produce three shots (one from each marker) so long as a ball is present.
· Each marker uses its own anti-chop eye system. Upon pulling the trigger each marker with a ball in the chamber will fire whereas the others will omit the trigger pull.
· Stock board firing modes are available, should the user so choose (although this is overkill).
· Any of the three markers can be activated or disabled at any time.
· Each marker uses its own air source to prevent pressure dropoff during rapid fire.
· Relatively minimal modifications were done to mount the markers together. Primarily, mounting holes were drilled to link the frames and bodies together. Most of the other modifications were weight reduction or cosmetic.
Note: this page was originally written in July 2006, then uploaded to the website in november 2006 for public viewing. The only thing to remember here is I didn't have a straightforward step-by-step creation method for this project. It was first conceptualized in my head and on the computer before I ever sat down to put anything together. Some parts of this project weren't planned out whatsoever. Sometimes that's okay, and this page shows how it all went down.
Conception:
Here in Michigan we play a lot of Big Game format events at the nearby fields. These involve a massive playfield, more than a thousand players on each team, and just about any marker you can find. Some people even take out a "sidearm" in addition to their main gun. What a perfect place to use a double gun! It will turn a lot of heads as well as be useful out on the field, especially when you're trying to attack an area housing 150 players on the opposite team.
I've wanted to make a "double Ion" for a few months, but once I started making actual plans for it I quickly decided it'd be nicer to go for the triple Ion instead. That way the gun would be centered in the middle and have increased firepower. The disadvantages would include being heavier and requiring more money to operate, since wasting paint is very easy. This will be expensive to run...much more expensive than it will cost initially. But that's okay, it's money well spent. Also remember that I won't be shooting it continuously, I do own other guns too...so it won't be used continuously while I'm on the field.
Arrangement:
What exactly will this system require? I would essentially need three separate Ions, at least two regulators, and at least two tanks for them. The main part of making this work would be mounting the guns together so they're connected and move as one unit. For this I decided that making a V-shaped mount would be effective and easy to make. I want to place at least two mounts on the gun to hold things together. These will be easy for me to make, while at the same time being probably the most difficult part of this whole project....or at least the most time consuming.
(editor note - this was long before I had any machining equipment beyond a drill press)
The idea is to forget about combining guns into the same unit, and just let each individual gun do its thing. Except all mounted together. That way, each gun will perform just as good as if it were all alone; each gun would have its own functional eye system, its own dwell setting, etc. The alternative would be to combine electronics and synchronize the guns, but that might not turn out as good since every gun works differently.
Only one gun will need to have a trigger. So the first issue is why not use only one frame, instead of three? Performance would suck if I used one solenoid for all markers, so I will put one solenoid for each assembly. I figure it'd be a lot easier to let the frame act as the mount and protect the electronics/solenoid, instead of making a custom housing or tray mount for everything. If I did that, I would essentially be recreating the stock frame, except shorter, which would be a waste of time in my opinion. Using stock frames to carry it out will make the setup a little more big and bulky, but it's the better route I think. The two side guns won't need triggers, I can connect everything to the center gun.
I know these parts will be needed:
-Three firing assemblies (bolt, fire chamber, boltstop, swivel donut)
-Three breech sections with feednecks.
-Three frames. I might be able to get by with broken ones depending on what regs I decide to use, so I'll work on that later. Broken frames will be MUCH cheaper so that will be the "goal."
-Three regulators of some kind (will decide on that later).
-One trigger.
-Three boards and three solenoids.
-Three exoskeletons...? Do I want to go with the "classic" look of just the fire chambers? It'd be easier to use exoskeletons, so I'll just go with that. Maybe I can paint them...
-Two tanks for the gun. I will go with CO2 tanks for this. No nevermind, I don't like using CO2, but I will use screw-in tanks.
-Three barrels.
-Three hoppers.
-Screws and fittings and such.
At this point I will need to do some shopping and acquire all the parts I need. I have enough parts to make one whole gun, plus a number of other parts, so I won't have to buy too much.
-A few weeks later, I've got all the crap I need for this, and it was pretty cheap. I was patient and waited to find deals on the items I needed...things pay off when you're not rushed with these projects! Now for the fun part, putting everything together.

(please note, my thought process doesn't exactly coincide with the selection of components in the above picture. Please bear with me as I exercise some creativity here).
The Mounts:
This will be the only part truly made from scratch. I have some aluminum stock available so I grabbed a chunk of 1/4" thick material to do the job. I whipped together some sizing ideas in CAD then measured them out...eventually I arrived at a useful V-shape that I will use, with some arbitrary dimensions. This should leave just enough room for the hoppers to fit on top. I might have to go with a higher feedneck for the middle gun, by making some spacers if required.
(edit, turns out I didn't have to worry about this).


There it is, the mount to hold the guns together. The mount looks a little uneven but this is due to the hand-filing I did to the edges so they wouldn't be sharp and slice me to shreds. This will go on the bottomline of the frames and screw up to them to attach. The question is....where to put the other one? After checking it out I decided the best place would be right under the vertical adapter. I originally wanted to put it on top of the vertical adapter, but I decided against it.
The Pneumatics:
The first concern is how many regulators to use. I tested this out using parts I had available and quickly came to the conclusion that I would not be able to surpass any reasonable fire rate if I used one or two regs with any number of tanks less than "one for each gun". From what I saw, each gun needs its own reg in order to keep up, so that's what I have to do. The original plan wasn't to use three of everything, but plans change when I find out new information.
With this in mind, and after a lot of consideration, I decided to go with manifold style Max-Flo regs that would be mounted to the gun someplace. The reason I went with these is because the manifold style reg is extremely versatile, being that it has four 1/8" NPT output ports around the outside of the reg and one 1/8" NPT input port. This means I can hook them up to the gun very easily, since 1/8" NPT fittings are easy to find, and also have a room for a gauge. I can drill the regs for 10-32 screws and attach the front banjo fittings directly to them instead of the vertical adapter.
(edit, please note that I didn't end up using 10-32 fittings, as you find out later).
The importance of this is that it means I won't use vertical regs to operate the guns. This means I dont have to worry about frames that are perfectly functional, which severely cuts down on the cost I had to pay for the parts I needed. Specifically, when I bought the three frames I specifically asked people for ones that had stripped air fitting threads. I offered people $20 for their damaged frame, which I feel was a generous price considering the frames will be useless to everybody else!
Anyway, after a bit of experimentation and imagination, I decided to mount the regs under the trigger section on the side frames. This was a very hard decision, since it turns out no matter where I could place the regs, they'd still be in the way of something, so I just picked the least in-the-way spot and went with it. I drilled and tapped the reg bodies for 6-32 screws and mounted them into position from the inside of the frame forward (where the grip panels would normally wrap around the front). The middle gun needs to be a bit different though, since I actually have to hold that frame with my hand. After a little more fooling around I ended up deciding to mount the reg to the front V-mount, but I'll do that later since the gun needs to be put together first.

After a bit more consideration I found some quaint little 1/8" NPT push-to-connect fittings that will fit the hose size I need. Screw these into the regulator output ports and the only other step will be to cut hose to length and pop it into the fittings.
The Electronics:
Last step, and turned out to be the fastest section of the creation. I ultimately decided to use "relocated" trigger switches in the end. I originally wanted to use a more complex "one board for three guns" setup, but instead of bothering with that I just went with the easier "board for each gun" setup. It was a lot easier this way and I'm glad I didn't bother making a whole new board, for time concerns. I'll leave that for the next multi-barrel marker I make.
The main benefit to this (besides for being EASY) is that it's more conventional in terms of how the gun/guns work. Each bolt will operate individually just like a stock Ion on drugs. This additionally allows me to activate however many of the guns I want, not just all of them or none of them. This way, if I want to save paint or air, I can just turn on the "side" Ions and leave the middle Ion off. Or, if one of the guns is broken, I can disable just that one and keep using the other two without wasting air.
(please note! This feature turned out to be extremely, EXTREMELY useful on the field. I ran into MANY situations out there where I quickly deactivated one of the side markers so I wouldn't have to sick too far out from a bunker. This action had crossed my mind before I played with it on the field, but I didn't think it would be useful...I was very wrong and it turned out to be invaluable!)
There were many ways to make this work but the one I ended up using I think was the easiest. I milled out the frame behind the trigger so I could mount the microswitches directly in there. This way the single trigger itself actually pushes on all three switches. I attached wires to the modified switches, epoxied them together with a non-conductive epoxy, and mounted them in the frame.


The next thing to do is connect the switches to their respective boards, using wire lengths. I remvoed the stock switches from the two side boards, and connected wires to the empty switch terminals. The wires lead to a disconnect, then over to the center marker where they attach to the "new" switches mounted on the middle frame. I used the same 2-mm Molex connectors that I use with literally everything else I do (paintball or otherwise) which will allow me to disconnect the side guns from their trigger switches in the middle gun, so I can remove the side firing assemblies for regular maintenance.

In the above picture, the two left boards have no trigger microswitches, and will be used as the "side" boards. The right board will be used in the center gun so it still uses the stock microswitch setup.
The Trial Assembly:
The only other thing to do is put it all together. Put the body sections together, screw on the solenoid assemblies like normal, then drop them all into their respetive frames. Since each gun uses its own switch, reg, and electronics, it means the firing assemblies are interchangeable and can be moved around as needed. The only thing that would have to change is the input pressure for the guns. I took this picture mid-way through.

The orignial setup is designed to house screw-in tanks on the gun itself. I drilled and tapped some cheap bottomline ASAs then attached them to the front of the side-marker frames. The two side tanks will be in front and the middle gun tanke will be in the regular bottomline position.
(edit; I ended up removing these mounts and using tanks on my back instead, so this was wasted effort.)
If you're interested to know what I did for the internals, I'm using modified stock bolts without QEVs, using the stock solenoids. I'm not worried about efficiency or cycle rates on this, since I obviously won't be bunkering people on a supAir field or whatever. This is a scenario gun made to deliver massive firepower at once, not to get the most shots per tank than the guy next to me. Besides, it's just a project gun...I'll save the performance for my competition markers.
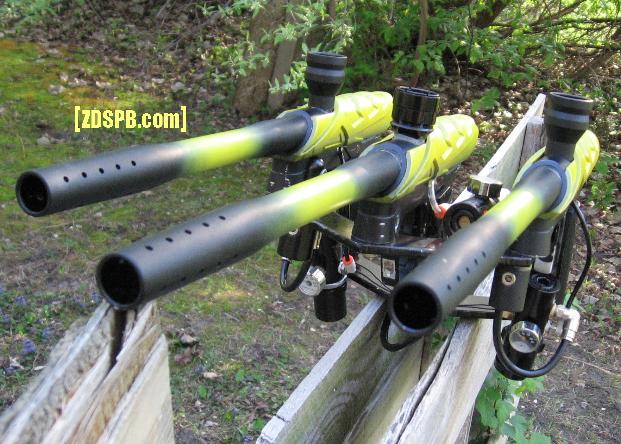
Here's the final product, in all its glory!
")
")
")
")
")
")
I actually ended up taking it all apart again so I could properly clean and maintain the firing assemblies (this is why I called this section "trial" assembly). They had been sitting around for a long time before I put the gun together, so they needed a good once-through before action. It's of course a good idea to be sure this gun is in top shape before we go to play with it, since troubleshooting leaking problems at the field is virtually pointless due to how long it takes.
Performance & Impressions:
This concludes the building-of page. If you're interested to know how the marker is on the field, follow this link to my Impressions page.